
Flowering is the last stage of development for an indoor plant. We would argue that this is the most crucial stage. What are the signs of flowering? Connecting nodes between two branches are known as internodes.
Internodes begin to shorten as blooming begins. In time, the plant stops growing as rapidly. There are now evident traces of bud development. The plant’s energy at this stage produces more of these buds. Moreover, the growth of fruit will become the main concern.
When the photoperiod changes, cannabis plants may begin flowering after many weeks in the vegetative growth and development stage. To harvest high-quality buds, you must know how to take care of your plants.
When Does The Blooming Phase Start?
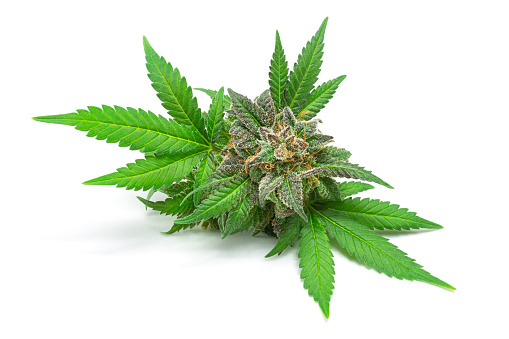
At the beginning of the marijuana flowering stage, which includes the pre-flowering and flowering stages, pistils emerge at the bud sites of your cannabis plants. Then, they mature into attractive flowers that are the main draw for cannabis users.
A weed plant’s life cycle consists of many distinct phases, from germinating a seed to finishing its last stages of development, including clipping and curing the buds.If you wanted to learn more about growing cannabis, read the in depth guide on how to germinate cannabis seeds?
There are seven steps to the overall process, but only two are essential to farmers. The growth of your cannabis plant’s stems, branches, and leaves occurs during the vegetative stage, and the groundwork is laid for robust blooming to follow.
In the blooming phase, your cannabis plant shifts its emphasis from leaf development to bud formation. Weed is a photoperiod plant; therefore, the onset of its blooming stage is timed to the length of the day and the light it gets.
This is a natural occurrence. The weed flowering stage is triggered by the plant’s internal mechanisms when days become shorter. Thus, it may generate and grow seeds and continue its lineage before the winter months arrive.
What exactly does it imply for you? That prolonged periods of nonconsecutive darkness may be used to bring on the blossoming stage’s first symptoms. This would occur in late summer if the plant was grown outside in natural conditions. Just switch to a 10 or 12-hour nighttime cycle indoors.
One should note that autoflowers show the first indicators of entering the blossoming stage once they reach a certain size. This variety begins its flowering cycle regardless of the time of day.
A Weekly Overview For The Flowering Stage
It takes another 7–9 weeks before the first blooming signs appear before the buds are completely developed on a weed plant. There is considerable variation in this estimate depending on factors such as cannabis variety, strain, seed variety, and growing environment.
Pre-flowering, the initial blooming stage, occurs during the first three weeks. Your plant begins to mature sexually, completes its vegetative phase of development, and begins to produce colas. Then the flowers open, grow and fill the air with their sweet fragrance.
So, let’s talk about when your plant will start showing symptoms of blooming, how long it will take for buds to form, and what you can do to help it thrive.
Week 1
There is a lot of leafy growth in the first week, and the plant begins extending to accommodate its heavy buds when it senses winter is approaching.
Over that period, phenotypes are not uncommon to expand by a factor of two.That’s why this is known as a stretch week. At this period, the crop greenery is greater and stronger, showing blooming signals similar to those seen during the vegging stage.
You shouldn’t switch to blooming nutrition just yet, even if this growth spurt is the first symptom of the flowering period. Incorporate lots of nitrogen for a minimum of five days.
Week 2
Beginning in week two, there are visible indications of growth. During this stage, the plant’s nodes between the stem and the fan leaves begin to develop into CBD flower buds that will eventually blossom.
Around each branch, the leaves twist and cluster together at the top. From their centers grow the white pistils that will eventually become the buds used for smoking.
Alternately, you may see little green membranes on the internodes. Then you’re dealing with male marijuana. If you can, try to do away with these herbs. At this stage, you may increase the amounts of phosphate and potassium in your plants’ diet.
Week 3
Beginning in the third week, your plant will show clear indications of beginning to flower. The plant is almost double what it was weeks ago. As this week comes to a close, the stretching has slowed significantly or stopped entirely.
While the pre-flowering cannabis likely had hairs in its internodes before this, you may now be able to see the first stages of true blooms.
When do buds first appear, and how do they look? The shapes between the leaves and the stem are rounded and hefty, and the green structure is covered with pistils. However, there are hardly any trichomes or resin glands to see.
The time to properly implement bloom remedies is this week. On the other hand, moderation is key, and any future crop may be jeopardized by nutrient burn.
Week 4
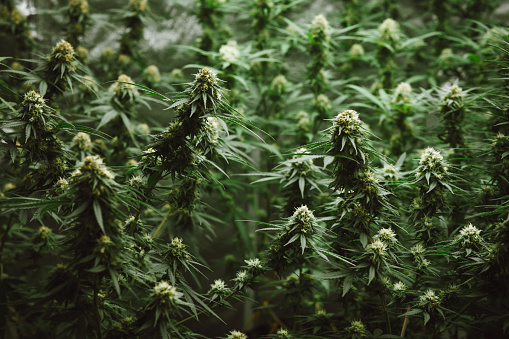
In week four, the symptoms of blossoming remain quite regular. By this stage, vegetative development has most certainly ceased. The blooms get bigger and fatter as they generate more white pistils. Trichomes begin to ooze, and you can already imagine how the completed result will smell.
The cultivar determines bud growth. The initial symptoms of blooming in a sativa take longer to appear. The earliest cannabis pistils may only be seen now, and bud sites on Indica plants should already be many.
Week 5
We should see the first signs of blossoming outside and within in the fifth week. You can now notice buds developing all over your plant. Each day, they will become bigger and smell better.
Some specimens may already have white pistil hairs that have darkened to pale amber. Translucent trichomes have become opaque, signaling that harvest time is almost here.
Week 6 And More
Since not all of the CBD strains mature simultaneously, we’re integrating the last three weeks’ worth of blooming indications. However, hardly any cultivar is ready before week eight, and not much happens until then.
In the last weeks before harvest, you may see the buds as they mature and gain weight. Remove some foliage, crank up the lights, and swat away the bugs attracted to the resin.
When flowering tapers down, it’s almost always time to flush out the weeds.
For a typical eight-week blooming period, you should stop giving crops nutrients beginning in week six, and you can wash away the surplus nutrients and expect an authentic taste for your taste buds.
Keep an eye out for problems and readiness, however. Identifying plants ready to be harvested is easy since they have trichomes and pistils.
What Is The Duration Of The Flowering Stage?
The flowering time for a cannabis plant averages between 8 and 11 weeks, usually divided into three halves or weeks.
The typical flowering time for indica strains is about 8–10 weeks. However, this is by no means set in stone, and ten to twelve weeks is possible for sativa types.
Commonly, hybrid strains need between 6 and 10 weeks to reach full maturity.
How Can I Tell If My Plant Is A Male Or A Female?
Cannabis is dioecious, which implies that it is possible for a female and male reproductive system to coexist on the same plant. The female marijuana plant’s blooms are what you now have in your stash jar.
Male plants generate pollen sacs towards the base of the leaves, while female cannabis plants create the wax flower cut down into the buds you smoke.
The buds originate from the female cannabis plant that does not produce seeds; male plants fertilize females to start seed development.
By cultivating clones or genetically identical cuttings from a parent strain, growers may assure the sex of their plants. Also available are feminized seeds, produced using a unique breeding technique.
Basic Conditions For Cannabis Plants To Blossom
Every stage of the cannabis plant’s life cycle requires light, but the flowering stage is particularly critical for sustaining a photoperiod of 12 hours of light and 12 hours of darkness.
Don’t try to disrupt the dark periods by opening your growth environment just for an instant.
Your plant may become more sensitive to light, slow down the budding process, or even revegetate or produce hermaphrodite flowers.
-
Size Of Containers
Your container’s size will always depend on the size of the plant. Are you thriving in the soil of your garden? in soil-filled pots? In containers?
The likelihood of having a larger plant increases with container size. Don’t forget to move your tree before it starts to bloom to prevent straining or unintentionally harming the plant.
-
Temperature
In the blooming stage, cannabis plants do best in temperatures between 19° and 27°C. Therefore, if the temperature falls below this range for an extended time, the plant may suffer unfavorable effects or perish.
Low temperatures may permanently harm the plant, while temperatures under 16°C may delay the plant’s development. On the other side, a plant likewise suffers from extreme temperatures.
Over 29° C may result in issues like stunted growth, burnt leaves, excessive water evaporation, dryness, etc.
-
Watering
Water your plant regularly using pure water. No doubt, utilizing filtered or chlorine-free water produces superior outcomes. Never overwater anything, and keep an eye out for excellent drainage.
When should I water my cannabis plant? A decent test would be to put your finger a few centimeters or an inch into the soil; if you feel it dry, it’s time to water.
-
Ventilation
For cannabis plants to flourish and develop healthily, ventilation and airflow are essential. They need oxygen at this stage to breathe, develop their bodies, and prevent the growth of mold, fungus, and rot.
Having a decent fan circulating the air within your growing space is beneficial, but take care not to aim it towards the buds. A good exhaust fan will promote ventilation and air circulation while reducing humidity.
A dehumidifier is unquestionably the finest and simplest option if an exhaust fan is insufficient to maintain appropriate humidity levels.
-
Humidity
Keeping the temperature at those warm levels and paying attention to the relative humidity in the growth environment are both essential. The relative humidity scale measures the proportion of humidity in the air.
In this stage, humidity should preferably be maintained between 40 and 50 percent. Increased humidity might result in issues like mold and fungus.
-
Nutrients
Phosphorus, nitrogen, and potassium are the three primary nutrients the cannabis plant requires to grow.
You should gradually raise phosphorus and potassium concentrations while decreasing nitrogen concentrations as the plant begins to blossom. For vegetative development and blooming, specialized nutrients are available.The plant will need additional secondary nutrients such as magnesium, calcium, and sulfur for proper growth.
The micronutrients are essential but only in minimal amounts, to finish. These include cobalt, silicon, copper, iron, chloride, and boron.
Which nutrient application schedule or feeding strategy is thus ideal for my plant? It is up to each farmer to decide how to give these nutrients, whether by foliar, liquid, or solid fertilizers.
Even when grown organically, plain soil is often insufficient for a plant to create large, dense buds.There are fertilizer kits available from several companies that are precisely designed with the right nutrients for each stage.
To prevent saturation, start with half the recommended dose or even less, then gradually raise the dosage until the desired effects are attained.
-
pH Values
When growing in soil, pH levels must stay between 6 and 7. Only within this pH range are the majority of nutrients in the growth area accessible to the plant.
When the pH exceeds this range, your plant may face toxicities and nutritional shortages because it cannot absorb the nutrients, even if they may be in the soil.
Expert Advice For Better Harvest
It might be frightening to guide cannabis plants through their blooming stage, particularly for novice producers.
To guarantee that you always have a bumper crop, go by this straightforward advice:
Watch For Your Plants Sex
In the last week of vegging or the first few weeks of blooming, most gardeners determine the sex of their plants.
Remember that if you don’t want your guys to pollinate your ladies, you should call or separate them from the men. A male plant’s pollen sacs resemble little balls.
Additionally, watch your female plants closely as they bloom in case any hermaphrodites emerge.
While it’s uncommon, some cannabis plants may produce both male and female flowers, while others, under extreme stress, can produce stamen in a last-ditch effort to produce seeds.
Correct Issues Before Flowering
If you cultivate plants inside, you have the benefit of being able to decide when they begin to bloom. Utilize this to your advantage and switch your plants to blooming only when they are completely healthy.
While your plants are developing, you don’t want to be making up for nutritional deficits or battling pests and illnesses.
You have less control over when your plants begin to blossom if you’re growing outside. Instead, you should closely monitor the calendar and make any necessary corrections before the summer’s conclusion.
Make The Change To Flowering As Easy As You Can
Temperatures and humidity requirements for flowering plants differ from those for veg plants. We advise gradually adjusting the temperature and humidity over two days.
Allow your plants to get used to these changes by keeping them in veg for just a few more days before switching your lights. It’s better rather than altering the temperature, moisture, and light cycle all at once.
Get The Right Lighting
During blooming, cannabis plants prefer red and orange wavelengths between 580 and 700 nm to promote the ripening of their flowers. Use a grow light with this range during the bloom period for the greatest results.
Avoid Transplanting Near Bloom Time
Transplanting shocks your marijuana plants. To preserve your potential production, never transplant shortly before or during the blooming stage.
Do The Trimming
Before blooming, give your cannabis plants training and trimming so that more light may reach the bud locations. Every grower has its pruning method, and the goal is to assist your plant in focusing its energy on the bud sites that will provide the greatest results.
Additionally, constantly cut any yellow or dead leaves throughout the blooming season. Until roughly week four, your plants should remain lush and green, but part of their foliage will start to wither as they focus more of their energy on bud development.
You may safely pluck any leaves that become yellow or entirely dry out since this is perfectly natural.
Maintain Appropriate Humidity Levels
Bud rot is a major problem that may obliterate an entire crop. Maintain a relative humidity of 40% in your grow space to safeguard your plants and maximize their development.
Keep An Eye On The Temperature
Cannabis plants are in flower-like daytime temperatures of 20 to 25 °C and nocturnal temperatures of 15 to 18 °C.
When turning on and off your lights, be cautious of any unexpected temperature changes. While abrupt climbs might result in dew forming on the surfaces of your buds, causing bud rot, abrupt dips can startle your plants.
Utilize An Airflow System With Carbon Filters
During the bloom period, adding CO2 may improve growth and yield. During blooming, try to maintain CO2 levels between 1,000 and 1,200 ppm.
Watch Out For Light And Nutrition Burn
Nutrient burn during blooming is unavoidable. Maintain a regular feeding schedule, and don’t forget to flush your plants two weeks before harvest.
Like nutrition burns, light burns during blooming cannot be made up for. Keep in mind to maintain a healthy space between your lights and the top of your canopy.
Healthy foliage may be damaged by a light burn, which can also lead to calcium deficiency during the first blooming stage.
You should raise your lights if your plants’ tops start to bleach while they bloom.
Bolster Heavy Buds
Flowering plants often lose their balance due to the weight of their buds. Use bamboo stakes and twine to support highly laden branches and ensure they get the most light.
Utilize Right Nutrition
Early on, using fulvic acid during the late veg/early bloom period might help your buds grow bigger. Don’t forget to feed your plants additional calcium during bloom in both soil and hydro settings.
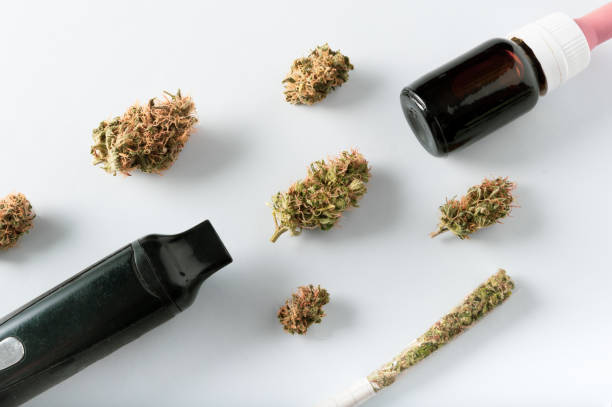
Important Steps After Harvest
Cultivating cannabis does not end with cutting down your plants; your plants still need to be dried, trimmed, and cured after harvest. So continue reading to find out more about these phases.
Comparison Of Wet And Dry Trimming
The choice between wet and dry trimming is crucial since it may impact the flowers’ potency, odors, and smoothness. For that reason, ensure to conduct a thorough research on how to grow weed at home to get healthy cannabis plants.
However, your chosen method will depend on your expertise, preferences, and drying circumstances. You must learn more about them to determine what is most effective.
Wet Trimming
When you trim your plants while they are still wet, you must immediately remove the leaves after cutting them down.
Wet Trimming Perks
- Fan and sugar leaves may be removed more easily since they tend to cramp up when dry, thanks to wet cutting.
- Since you’re not hanging the whole plant as you would with dry trimming, wet trimming requires less room.
- Fan leaves hold moisture, so pruning after rain reduces the risk of mold damaging your crop.
Problems With Wet Trimming
- Wet pruning has to be done right after harvest; however, depending on how many plants you’re cultivating, it can take a while.
- It may have a detrimental impact on the quality of the blooms by causing plants to dry out more quickly than they should.
- Your hands and scissors may get quite sticky after wet trimming, so you’ll need to constantly wipe everything with rubbing alcohol.
Dry Trimming
Contrarily, dry trimming entails cutting your plants after they have dried for a few days or after the drying process is complete.
Doing so requires that you hang your plant entirely with all of its leaves and remove them only after the drying process is complete.
Advantages Of Dry Trimming
- As leaves keep it moist, dry trimming gives you greater control over drying time and prevents your plants from drying out too rapidly.
- It enables you to take your time drying, making the process simpler.
- As buds lose more chlorophyll and provide a smoother smoke, dry trimming marijuana typically improves the taste of your crop.
Problems With Dry Trimming
- Trimming dry plants may be more challenging since the leaves might stick to the blossoms.
- Due to the moisture in fan leaves during drying, dry trimming increases the danger of mold growth.
- Since you are hanging the whole plant, with all its leaves and branches, dry pruning takes up more room.
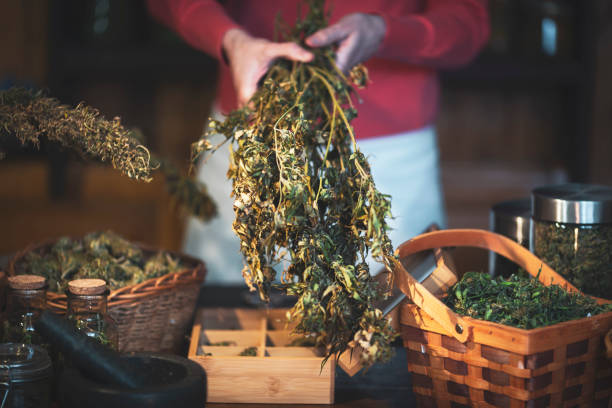
Drying The Plant
It’s time to hang your plants in the drying room after harvesting them. While removing the chlorophyll that gives flowers their distinctive plant flavor, this technique may help preserve and improve the taste.
So all you have to do is hang them upside-down in an environment with a relative humidity of 60% and a temperature between 20 and 23°C. Depending on how you’ve cut your plants, the whole procedure should take place between one to two weeks.
Curing And Burping The Buds
Curing your flowers is the next step after drying and trimming them. Keep the flowers in glass containers as they cure to prevent them from drying out and keep the terpenes intact.
Time spent curing might range from a week to many months, depending on the strain and how long you want it to be. To preserve the buds, you need just store them in a container with a relative humidity of 55-65%.
When cured correctly, marijuana stays fresh for longer and is less likely to develop mold. Flowers may be kept for at least two years if they are cured and stored properly. Don’t forget to burp your jars weekly throughout the curing process.
As previously indicated, burping the buds during the first week of curing is necessary to allow excess moisture to evaporate and fresh oxygen to enter the jar.
Remember that if the buds start to emit a foul odor, it implies they are not dry enough and might lead to mold, so if this occurs, burp the jars more often until the buds are ready to use.
FAQS Regarding Initial Flowering Stage
When do you start harvesting after flowering?
According to their respective blooming times, the following are some of the most popular strains including OG kush, gary payton etc and the optimal times to harvest them: eight weeks of blooming is the norm for Indica.
Ten weeks of blooming is optimal for sativa. From seed to bud, autoflowering plants takes just 10 to 12 weeks.
When growing inside, how long does the blooming period typically last?
Turning off the lights for 10-12 hours will trigger blooming while growing inside. The blooming time for most cannabis strains is between 7 and 9 weeks, while certain sativas need even more time.
How can I hasten the onset of my bloom?
Exposing a photoperiod strain to light for around 10-11 hours daily can accelerate its growth cycle considerably. If you turn down the lights, your plants will believe it’s falling sooner.
During blooming, should I prune the fan leaves?
It’s true that, after flowers have formed, you should skillfully prune away the fan leaves. Reduced shading and improved airflow in the lower canopy result from removing fan leaves.
Furthermore, this will allow your plant’s vital components to get more energy, leading to a larger harvest.
Conclusion: What Are The First Signs Of A Flowering Stage?
It is essential to provide correct treatment and the diagnosis of emerging concerns to understand the first indicators of the blossoming stage and how it progresses.Pre-flowering occurs between weeks 1-3 and is the first stage of blooming. The growth of plants accelerates, then stops abruptly, and pistils emerge.
By week five, the pistils have matured into dark brown trichome-covered buds. This is where the flowering stage begins.The sixth, seventh, and eighth weeks are crucial for bud fattening and ripening. Typically, autos are ready to be harvested after week five, whereas photoperiods need a further three weeks.
Our summary will help you quickly keep tabs on your crops and spot problems when tracking the flowering stage outdoors or indoors. Use the advice for preparing for harvest to ensure success in every growing season.